

If, like me, you love wearing stripes, you really need to learn how to stripe match. Look at most cheap high street stripey clothing to see great examples of awful (non existent) stripe matching. Argh, it sets my teeth on edge!!
If you’re making your own clothes you have the power to change that and get beautifully matched stripes every time.
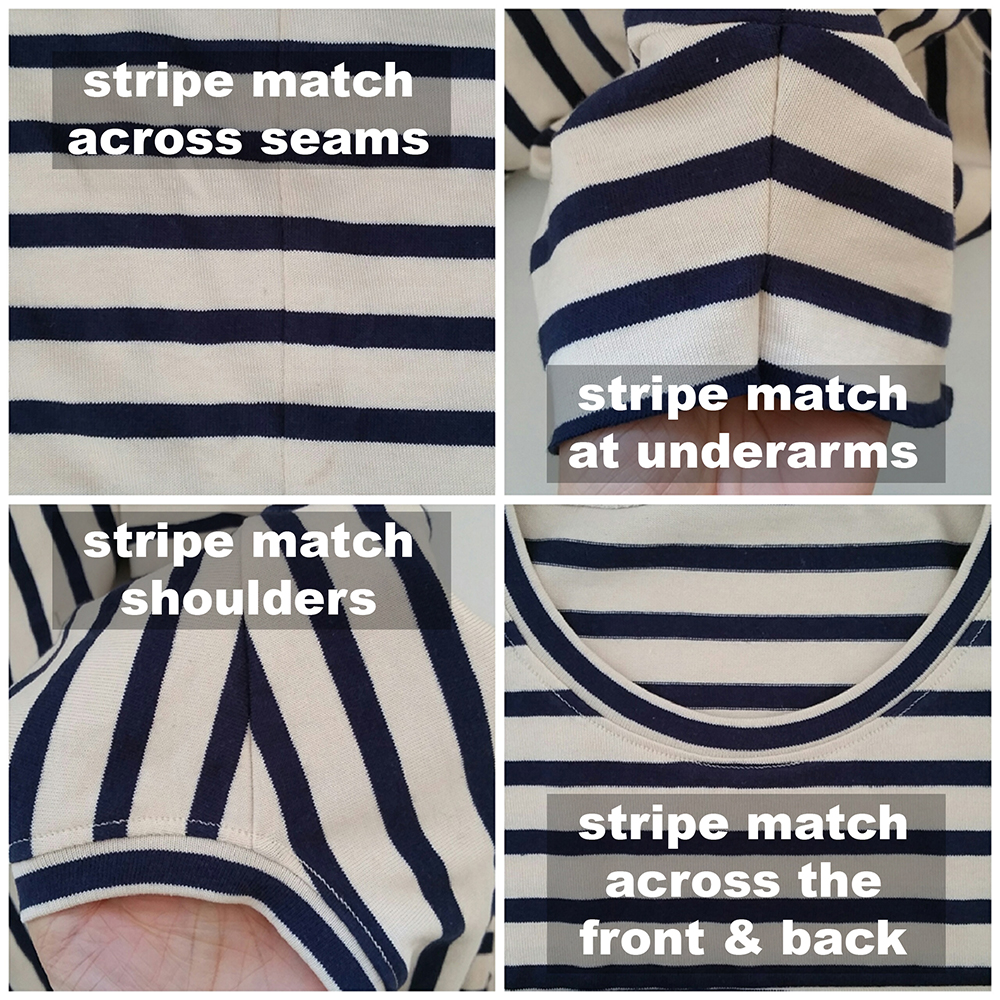
I’m going to show you some of my simplest stripe matching tips so that you can achieve results like these. Spoiler: there are no shortcuts. It takes time to achieve perfection and sometimes it can be wasteful of your fabric, that’s why you’re unlikely to find it on the high street.
I’ll show you how to ensure perfectly matching stripes at every stage of making your garment:
- Planning Stripes
- Stripey Layouts
- Cutting Stripes
- Sewing Stripes
STEP 1: PLANNING STRIPES
Fact – some stripes are easier to sew than others. If this is your first attempt at stripe matching, go wide. The wider the stripe, the easier the stripe matching.


In these examples, the stripe on the right may just tip you over the edge if you haven’t had a bit of experience with stripe matching.
The second thing to consider (more in terms of fabric consumption and cutting) is whether your stripe is symmetrical.
A stripe with a simple symmetrical repeat (like the 2 above) will allow you to use a 2-way lay plan ie. you will be able to turn pattern pieces upside down in order to make best use of your fabric.
These two examples of asymmetric stripes would mean placing all your pattern pieces the same way up with the tops of the pattern pieces all at the same end of the fabric:


Here’s an example of one of those stripes in repeat with front and back pattern pieces placed on it in different directions:

You can see straightaway how the stripe repeat would be different across the front and back of the garment; that narrow double red stripe would always be above the wide red stripe across the front, but below it across the back.
STEP 2: STRIPEY LAYOUTS
Once you have worked out whether your fabric has a symmetric or asymmetric stripe, you’re ready to start laying out your striped fabric ready to cut.
If you’re working with a knitted fabric and a horizontal stripe, this can be a challenging stage. You need to be sure that your fabric is square and if you want to cut out your fabric folded, that fold has to be spot on and the same stripe must be sitting on top of itself with the fabric folded otherwise you’ll never be able to match your seams and your horizontal stripes will end up looking a bit sea sick.
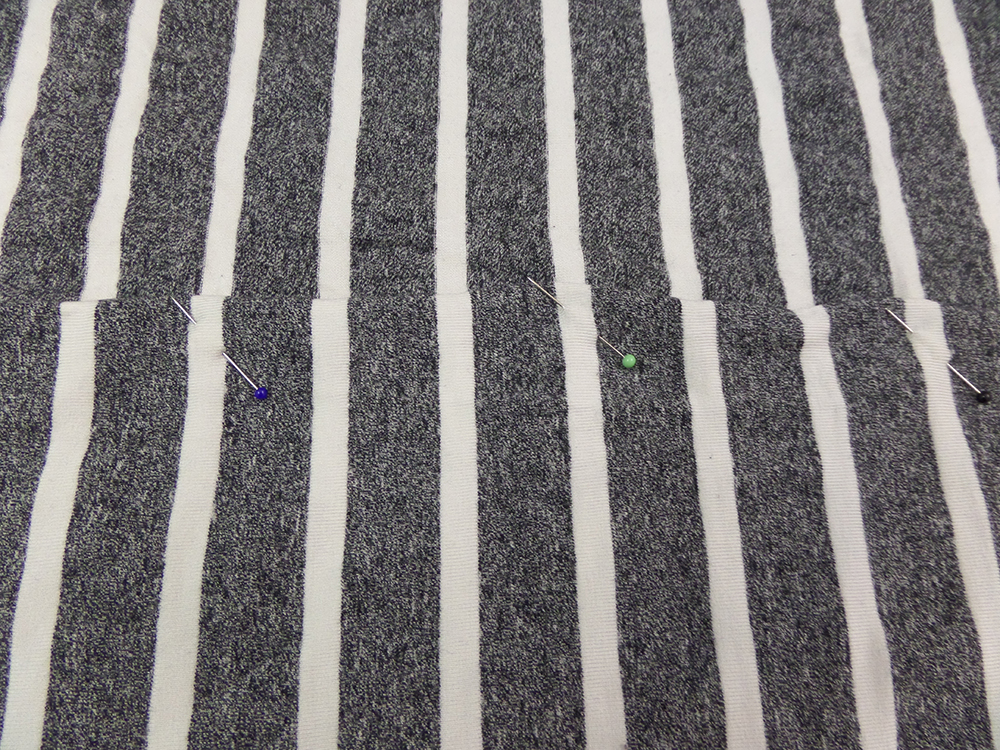
I tend to cut stripes on the right side of the fabric to be absolutely sure they’re going to match, so once you’ve folded your fabric and followed the same stripe around the fold to the underside of the fabric to ensure it’s sitting on top of itself, pin the ends of the stripes along the selvedge to hold them in place. I like to pin every few stripes – yes you’ll be using a lot of pins!

This is also when you can find lots of knitted fabrics haven’t been cut square. You can see where the 2 selvedges meet in the middle of the fabric above; once I had matched up the stripes the selvedges were drifting off at a bit of an angle. This is because most knitted fabrics are knitted on circular knitting machines as a tube. As most home dressmakers are used to working with “open” fabric, this tube is then cut open, not always accurately.
If you’re struggling to keep your stripes matched when folding your fabric, don’t panic, just cut out your fabric as a single layer. To make life easier, adapt any pattern pieces that are cut on a fold into full pattern pieces and remember to flip over pieces that are cut twice to make sure you get a left and a right piece and not two identical ones.
STEP 3: CUTTING STRIPES
Now you’re ready to place your pattern pieces onto your fabric and start stripe matching across the different parts of your garment.
The key thing to remember, is to start with one prominent pattern piece (such as the front) and line up the same points on each pattern piece with the same part of the stripe. The easiest points to line up are the hemline or the top (underarm point) of the side seam.

Always try and follow a stripe along straight hems and if you’re working with an asymmetric stripe with a very dominant colour or wider stripe in the repeat, think carefully about where you want that to end up in your garment as it’s likely to draw the eye to that particular area.
I prefer to weight my patterns and draw around them on stripes, again to ensure I’m being as accurate as possible. Then remove the paper pattern and cut along the chalk lines. If you’re working on folded fabric, place a few pins within the chalked out pattern piece at its extremities to ensure the layers don’t move while you’re cutting.
A note about bust darts – if your side seam incorporates a bust dart on the front of the garment, begin your stripe matching at the hem. Only by chance will the stripes match above the dart (it’s all down to the size of your dart and width of your stripes) and you have the longest expanse of seam visible to the stripe-matching police below the dart!
STEP 4: SEWING STRIPES
Now, if you don’t like tacking or precision sewing, maybe stripes aren’t for you just yet as we’re going to be doing a lot of pinning and tacking.
First, match up the stripes at each end of your seam and pin them accurately together. Then, work your way along the seam pinning every stripe for wide stripes and every other stripe or every 2nd stripe for narrower stripes. Place your pins at right angles to the edge of the fabric; you can fit in more pins and the pin is holding more of the stripe in place.

Take a peek and double check the stripes in between your pins are aligned before you start tacking.

Set your sewing machine to do a tacking stitch: a straight stitch on the longest stitch length setting.
Machine tack your seam together ON THE SEAMLINE don’t tack to one side because when you do your final stitching the stripes can move out of alignment.

Once tacked, open the seam to check the stripes are matching.

If they have moved (yes, I know how frustrating it is once you’ve got this far and been sooooo careful), don’t fret, all is not lost. Your fabric is likely to be either very stretchy, a bit thick or a bit “bouncy” and the top layer of your seam has been moved slightly by your machine, pushing the stripes out of alignment.
Here’s how to fix it:
1 – If your machine has the facility, reduce the presser foot pressure.

This reduces how hard the presser foot presses down on your fabric and so can stop your machine pushing that top layer of stripes out of alignment.
2 – Use a walking foot.


The walking foot has an extra set of feed dogs (the little metal teeth under the presser foot that feed the fabric through the machine) which means your 2 layers of fabric feed through the machine evenly without the top layer being pushed out of alignment.
A walking foot tends not to come as a standard accessory with your sewing machine and so needs to be bought separately. Make sure you buy the correct foot for your make and model machine. The price will vary according to what sort of machine you have. It’s worth investing in a walking foot if your machine doesn’t have the facility to adjust the presser foot pressure.
A note about hand tacking – anyone that knows me knows that I love a bit of hand tacking, but honestly, I don’t think it’s the best method for tacking stripes; machine tacking is just that bit more secure which is exactly what we need when stripe matching.
Once you’re happy with your stripe matching after tacking, carry on and permanently stitch the seam using your chosen method. If you’re sewing a knitted fabric with just your regular sewing machine, I have written lots of tutorials with advice on different machine settings here. If you’re going to overlock your seams, here’s a short video of how easy your overlocking will be once you’ve machine tacked your stripes in place! Note that I’m following the tack line with my left needle thus making it the seamline.
Now you too can become a stripe matching geek!


Pingback: Round-up: Tutorials for Sewing with Stripes – Sewcialists
Pingback: My first Tilly and the Buttons Coco top.
Pingback: A Stripy Gable | Jane Makes
shared on Facebook page Sassy Sewing Bees
LikeLike
Thanks 😊
LikeLike
Unmatched seam stripes always make me wince. Excellent tutorial – it should be compulsory for all dressmakers!
LikeLike
Thanks! If you’re taking the time to make something it makes sense to take that bit of extra time to match up your stripes doesn’t it?!
LikeLike
Hi Wendy
A great tutorial!! By the way, do you have any diagrams of matching up stripes on sleeves, so that when they are sewn to the bodice, it gives the appearance of a continous line?
Thanks
Tanys
LikeLike
I’m thinking of doing that in a separate tutorial as a few people have asked!
LikeLike
Did you ever do the tutorial on stripe matching sleeves? I’m sitting here staring at my pattern pieces and material unable to figure it out. I’ve matched and cut the body, front and back, but stumped on placement of the sleeve! Help…
LikeLike
Maybe one day!! It’s a super tough one and not always possible. It’s so dependant on the shape of the sleeve head and the size and spacing of the stripes…..
LikeLike
Very helpful post, thankyou. I never used to notice unmatched stripes on clothing until I decided to ‘have a go’ at making some things for myself. Now I find myself looking and tutting! Definitely the curse of the maker 🙂
LikeLike
Great post! Unmatched stripes are one of my pet peeves too.
LikeLike
When you can make your own clothes and stripe match you just see clashing mis-matched stripes checks and patterns everywhere don’t you?! The curse of the maker 😁
LikeLiked by 2 people