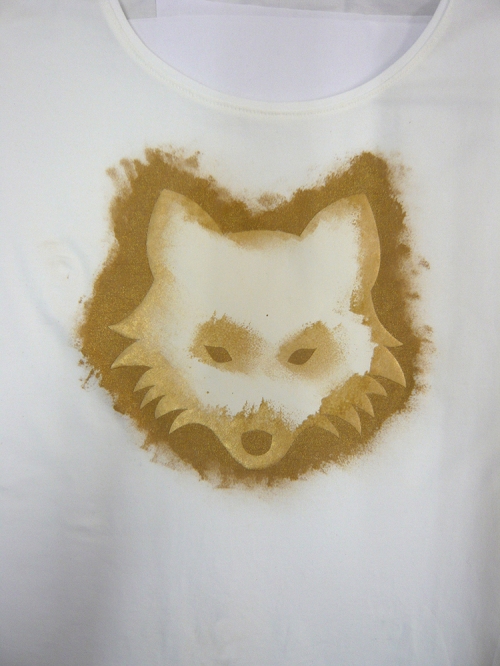
Here’s a quick and professional looking way to customise a shop bought t-shirt, using a freezer paper; brilliant stuff that’s been used by patchwork and quilters for years.
You will need:
- a plain t-shirt
- freezer paper (it’s made by Reynolds and is available from most big sewing supplies shops)
- fabric paint (I’ve used Dylon fabric paints on my t-shirt, you could also use a fabric spray paint like the Marabu one in the picture, just make sure you choose an opaque paint if you want a bold graphic effect like my t-shirt)
- a chopped up washing up sponge or a paintbrush
- cutting mat
- craft knife
- pencil
- a design for your stencil (or you can download my foxy face).
What to do:
1. Cut a piece of freezer paper to fit your stencil and to fit onto your t-shirt.
2. Position the stencil on the freezer paper and draw around it.
3. Cut the design from the freezer paper carefully using a craft knife or scalpel and a cutting mat to protect your work surface! TIP: be extra careful in the corners to make sure you don’t tear the paper.
4. Take the shape of the fox’s head that you’ve cut out of the freezer paper and place it shiny side down in the position you want it to be on your t-shirt. Iron the paper and it will stick to your t-shirt. Move the iron slowly and be sure to go over all the edges and corners, but be careful not to scorch your t-shirt.
5. Slide a couple of sheets of paper in between the layers of the t-shirt so that the paint doesn’t go all the way through both layers.
6. Using your washing up sponge gradually apply the fabric paint over the edges of the stencil. TIP: don’t put too much paint on the sponge at any one time or it will make big uneven splodges on your t-shirt and you may even drip it in the wrong place!
7. Leave the paint to dry for a few hours before trying to remove the stencil.
8. Once the paint has dried remove the stencil carefully.
 Iron the paint to set it and make it permanent. TIP: use some thin muslin over the top of your t-shirt – this enables you to use a hot iron without scorching your t-shirt and ensures no paint could find its way onto your iron!
10. Your stenciled design is now fixed and permanent and your garment can be washed as normal.
If you don’t like the “reverse” or “negative” style of the stencil on my t-shirt, use the shape that was left behind when you cut out your stencil to get a “positive” image like this one:
Happy printing!
Find the first post in my Customising series here, it’s all about how to make and use Suffolk Puffs.


Pingback: Print Your Own – is printing your own fabric the ultimate me-made? | Wendy Ward
I’m sure my Mum used to bring back the wrapper from the photocopying paper at work; this was ‘freezer paper’ too. She used it for patchwork.
LikeLike
Brilliantly resourceful! I never knew that was freezer paper, but thinking about it it does sometimes have that waxy finish.
LikeLike