


You may have noticed that the Techniques section in Beginner’s Guide to Making Skirts is pretty thorough and covers a lot of ground, but it should have been even more thorough as I wanted to include a section on how to line your skirts. In the end it just wouldn’t fit into the pages we had and I made the decision to cut the whole Lining section, rather than trim all of the Techniques making them less detailed (and in my opinion less useful).
But, all is not lost, it means I can post that whole Lining section here!! So, read on for a comprehensive guide for how to add a lining to all the skirts in Beginner’s Guide to Making Skirts…….
Why Add a Lining?
Linings can have several functions in a garment:
- COMFORT – a lining can be more comfortable to wear against your skin if your main fabric is at all rough (some wool fabrics) and can help prevent a fitted skirt (like the Fallowfield Pencil Skirt) from “gripping” and climbing up your legs when wearing tights. It can also make your skirt easier to slide on and off.
- LUXURY FINISHING – a lining will cover up all the construction details on the inside of your skirt, giving a professional, neat finish and lining can also improve the hang of your skirt and the way it moves when worn.
- PREVENTING TRANSPARENCY – if your main fabric is at all see through, a lining can reduce this.
- MAINTAIN SHAPE – loosely woven fabrics can “seat” (stretch and become a bit baggy) over your bottom in fitted skirts such as the Fallowfield Pencil Skirt. Adding a lining (or even a half lining) can help prevent this.
I’m going to show you how to add a lining to the following projects:
• Hollings Circle Skirt
• Rusholme A-line Skirt
• Fallowfield Pencil Skirt
• Brighton Front-opening Skirt.


The Granville Wrap Skirt and the Finsbury Bubble Skirt have linings incorporated into them that are explained within the project instructions. Knitted fabrics such as those used in the Roewood Jersey Pencil Skirt don’t lend themselves to being lined.
Obviously adding a lining adds a layer of complexity to the making of your skirt. Linings are easy when you know how, but don’t attempt one until you have first made a few unlined skirts so that you are more confident with some of the basic techniques such as seams, hems, and zippers.
How to Choose a Suitable Lining Fabric?

COLOUR
A good lining fabric should be in a shade to match your main fabric (you don’t want the lining to show through your skirt). However, if your main fabric is opaque (you can’t see through it) it can be nice to use a complete contrast colour for your lining—a secret flash of colour that only you know is there!
FABRIC TYPE
Satin fabrics are best, as they are smooth and so won’t grip and climb up your legs. Lawn can be used for less fitted styles; choose a weight similar to your main fabric. (There is more information about different types of fabrics in my Fabric Dictionary.)
FIBRE TYPE
Natural fibres are nicest to wear, as the lining will be next to your skin and natural fibers are absorbent, meaning they won’t be static; an important quality for linings, as you don’t want the lining to simply “stick” to your legs. Common fibres found in linings are silk, cupro, viscose, and polyester (have a read of my Fabric Dictionary for more information about the properties of different fibres). If you choose a synthetic lining such as polyester, try and find one with an anti-static finish.
How to Care for Your Lining?
Choose a lining that can be washed and ironed on similar settings to your main fabric. You also need pre-wash your lining (read more about pre-washing fabric in this post), especially natural fibre and viscose linings.
Can I Use a Half Lining?
You can just add a half lining to your skirt to help it keep its shape and prevent seating. A half lining can be used in the Fallowfield Pencil Skirt and the Rusholme A-line Skirt. Follow the relevant instructions for the skirt you’re making, but cut the lining to mid-thigh length only.
How to add a lining to the Hollings Circle Skirt

To make the lining pattern:
- Use the same pattern pieces as for the skirt front and skirt back, but make them ¾ in. (2 cm) shorter. The number of pieces to cut in lining is the same as for the main skirt.
- Fabric requirements will be same as for the main skirt.
To attach the lining:
- Following steps 2, 4 (but joining the center back seam only as far as the dot marking the end of the zipper), 5 and 6 of the basic version of the Hollings Circle Skirt, assemble the lining.
- Assemble your main skirt and stop before attaching the waistband (steps 1 to 6).
- Press the seam allowances of the center back seam in the skirt lining back toward the wrong side of the fabric (the lower part of this seam is joined below the dot and should already be pressed open).

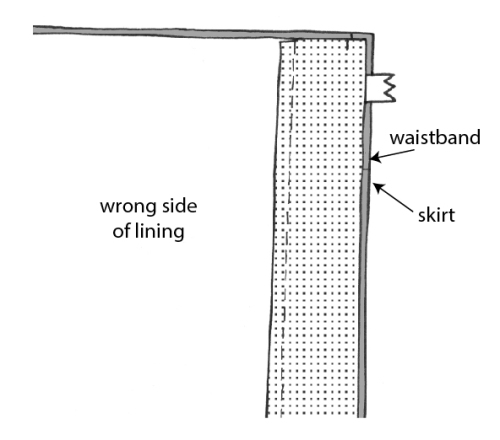
- With the main skirt inside out and the lining skirt right side out, slide the lining skirt over the main skirt so that the wrong sides of the fabric are together. Match up the side seams and pin the two layers together around the waist.

- Machine the outer and lining skirts together, making sure you use a seam allowance slightly less than 5/8 in. (1.5 cm) so that this line of stitching won’t show on the outside of the skirt once the waistband is attached.
- Attach the waistband to the skirt.
- Pin the folded-back seam allowances onto the zipper tape on the inside of the outer skirt and slipstitch in place by hand.

- Hem the outer skirt and the lining separately from each other so that, when finished, the two layers hang independently from each other. The lining is only attached to the outer skirt at the waistband and around the zipper.


How to add a lining to the Rusholme A-line Skirt

To make a lining pattern for a Rusholme skirt with a waistband:
- Use the same pattern pieces as for the plain version of the skirt front and skirt back, but make them ¾ in. (2 cm) shorter. The number of pieces to cut in lining is the same as for the main skirt.
- Fabric requirements will be as for the plain version of the skirt in your chosen length.
To attach the lining:
- Following steps 1, 2 and 4 of all versions of the Rusholme A-line skirt, (but joining the center back seam only as far as the dot marking the end of the zipper), assemble the lining.
- Make and attach the lining, as described for the Hollings Circle Skirt.
To make a lining pattern for a Rusholme skirt with a waist facing:
- Use the same pattern pieces as for the plain version of the skirt front and skirt back, but make them ¾ in. (2 cm) shorter. The number of pieces to cut in lining is the same as for the main skirt. Before cutting the paper pattern pieces out, mark a line along the top of the skirt front and skirt back where the facing would come to (you can place the facing pattern pieces onto your pattern to mark this).
- Add a 5/8-in. (1.5-cm) seam allowance above the lines you have just drawn on the skirt front and skirt back and cut out your new front and back lining pieces.

- Add a 5/8-in. (1.5-cm) seam allowance to the lower edge of the front and back facing pieces and cut out these pieces in your main fabric and interfacing.


To attach the lining:
- Assemble your main skirt and stop before attaching the waist facing.
- Trim ¼ in. (5 mm) from the waist facing pieces that you cut out in interfacing so that they are a bit smaller than the fabric pieces. Following the manufacturer’s instructions, attach the interfacing pieces to the wrong side of the front and back waist facings.
- To attach the linings to the facings, place the front lining right side up on a flat surface and mark the center front with a pin.
- Mark the center front of the lower edge of the front waist facing with a pin. Lay the front waist facing on the front lining with the right sides of the fabric together and the lower edge of the facing level with the top edge of the lining. Pin the center fronts together.

- Bring each side-seam edge of the facing around to meet the side-seam edges of the lining and pin the two layers together along the top edge at each side seam. At this point you may think that the two pieces won’t fit together. They will: it’s just that you are trying to join to opposite-shaped curves, which is tricky. Use lots of pins, pin on the seam line, and insert your pins at right angles to the edge of the fabric and the two pieces will fit together.


- Tack securely along the seam line and machine in place. Clip the curve of the seam allowances and press the seam down toward the lining.
- Repeat steps 3 to 6 with the two back skirt lining pieces and back waist facing pieces.
- Following steps 3 and 4 of all versions of the Rusholme A-line skirt, (but joining the center back seam only as far as the dot marking the end of the zipper), assemble the lining.
- Press the seam allowances of the center back seam in the skirt lining back toward the wrong side of the fabric (the lower part of this seam is joined below the dot and should already be pressed open).
- Attach the lining and facing to the main skirt.
- Hem the outer skirt and the lining separately from each other so that, when finished, the two layers hang independently from each other. The lining is only attached to the outer skirt at the waistband and around the zipper.


NOTE
For all versions of the Rusholme A-line skirt, including the versions with pockets and pleats, use the completely plain version for the lining.
How to add a lining to the plain version of the Fallowfield Pencil Skirt (i.e. no vent or godet)

To make a lining pattern for a skirt with a waistband:
- Use the same pattern pieces as for the plain version of the skirt front and skirt back, but make them ¾ in. (2 cm) shorter. The number of pieces to cut in lining is the same as for the main skirt.
- Fabric requirements will be as for the plain version of the skirt in your chosen length.
To attach the lining:
- Stitch the darts in the back skirt lining pieces and the front skirt lining piece. Staystitch the waist edges of the front and back skirt linings. Zigzag the center back seam allowances and join the center back seam only from the hem to the dot marking the end of the zipper. Press the seam open. Follow “All Versions: stitch side seams” of the Fallowfield Skirt project to join the front and back lining skirts together.
- Attach the lining as described for the Hollings Circle Skirt.
To make a lining pattern for a skirt with a waist facing:
- Follow the instructions for how to make a lining pattern for the Rusholme A-line Skirt with a waist facing, but using the Fallowfield Pencil Skirt pattern pieces.
To attach the lining:
- Follow the instructions for how to attach the lining for the Rusholme A-line Skirt with a waist facing.
How to add a lining to the Brighton Button Through Skirt

To make the lining pattern:
- Use the same pattern piece as for the skirt back, but make it ¾ in. (2 cm) shorter. For the front lining, use the same pattern piece as for the skirt front, but cut along the marked lining cutting line if you are making a zipper version and cut along the center front line if you are making a button fastening or popper version. Make your front lining ¾ in. (2 cm) shorter than the outer skirt to match the back lining. The number of pieces to cut in lining is the same as for the main skirt.
- Fabric requirements will be same as for the main skirt.
To attach the lining:
- With right sides together, making sure you match the hip notches, pin the front linings to the back and machine the side seams.

- Neaten the waist edge of the lining and then hem the lining. As the hem of this skirt is pretty straight, it is easiest to hem the lining with a double turned hem.
- Gather the waist of the lining as explained for the outer skirt in the Brighton Front-opening Skirt instructions.
- Construct the outer skirt as far as the stage of attaching the waistband for the press stud, popper, or button fastening version, or the stage of attaching the separate front facing to the waistband for the zipper fastening (stop after step 6 of the zipper fastening instructions).
- With right sides together, attach each front edge of the lining to either each fold-back facing (for a button/popper fastening version), or each separate front facing (for a zipper version). Press the seams toward the lining.

- For the popper or button fastening version only: With wrong sides together, fold the front facing of the outer skirt along the marked fold line, pin the waist edges of the lining and the outer skirt together, and baste (tack) in place so that they can be treated as a single layer when attaching the waistband.

- For the zipper fastening version only: Attach waistband to the skirt and tack the zip in place stopping after step 6 of the outer skirt instructions. Then attach the separate front facing and lining to the front edge of the outer skirt and lower edge of the waistband, sandwiching the zip in between.
- Continue to follow the Brighton Front-opening Skirt instructions for the version you are making to finish the skirt.


Great additional information to add to your book and much appreciated.
LikeLike
Thanks Pamela hope you’ll find it useful.
LikeLike
I am really interested in adding a lining to the pencil skirt *with* back vent. Please could you add the additional information for that style. – That would make the book so much more useful for me as, unfortunately, too much of my day involves sitting at a desk so unlined skirts ‘bag’ very quickly.
Many thanks!
LikeLike
Hi I’m afraid I only got as far as instructions for the basic versions of each skirt!
LikeLike