
“The first thing you need to do, is take some accurate measurements.” A statement almost always greeted with groans in my sewing classes! It’s a minefield because it taps into women’s insecurities and can be a source of angst and denial for many. As this subject almost always sets me off on a bit of a rant, I’m writing a much more detailed post about it which will be published soon.
For newbie sewists who are just venturing into the world of dressmaking, taking measurements and deciding which pattern size to use can often be one of the most confusing stages and it comes right at the beginning before you’ve even picked up a pair of scissors!
1 – HOW TO MEASURE YOURSELF
Slip into something more comfortable (vest & leggings!), get out your tape measure and some string and we’ll begin……
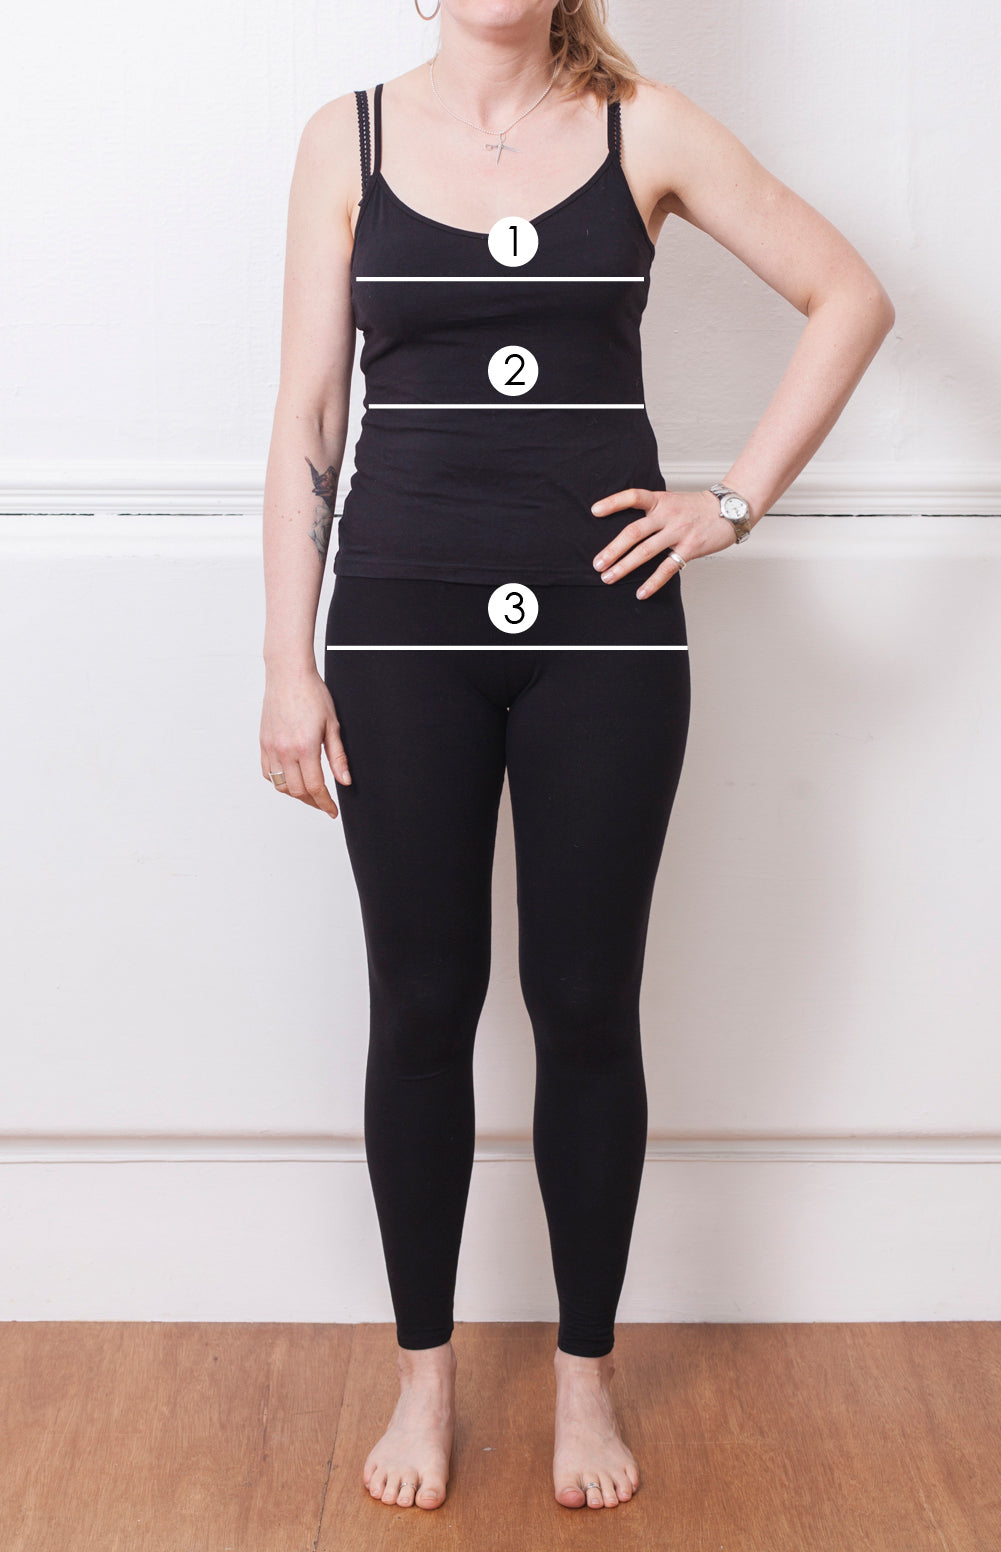
Image copyright Julian Ward.
- BUST: measure around the biggest part of your bust, make sure that the tape measure is straight across your back, not sliding down and have your arms by your sides.
- WAIST: tie something snugly around your middle, wriggle and it will come to rest on your natural waistline. It is higher than you might have thought – just under your rib cage, well above your belly button. Measure your waist here.
- HIPS: measure around the widest part, which is usually the biggest part of your bum, right over your hip joint. Check the tape measure in a full-length mirror to make sure it is parallel to the floor. TIP – if your widest point is lower than this, make a note of that measurement too.
2 – HOW TO CHOOSE WHICH SIZE TO MAKE
Most patterns will have a body measurement size chart which is the first thing you need to look at to work out which size to cut.
Now, don’t freak out! You probably won’t match each measurement for a given size on your pattern’s body measurement size chart because we are all different proportions. So to start with, for skirts and trousers choose a size based on your hip measurement, for tops and dresses go with your bust measurement.
Some patterns also include a size chart showing the measurements of the finished garment on the outside packaging of the pattern. Other patterns include this information printed on the actual pattern pieces, which isn’t so helpful when you’re in the shop trying to figure out which size range to buy.
This finished garment sizing information is the most useful as it enables you to gauge how tight or loose fitting your garment will be once finished. These finished garment measurement charts include the ease which is built into the pattern.
3 – WHAT IS EASE?
Ease is the difference between your body measurement and the measurements of the finished garment. Unless a garment is meant to be skin tight or stretches to fit, the measurements of the finished garment for a given size will always be bigger than the measurements on the body measurement size chart for that same size. How much bigger depends on the amount of wearing ease (minimum ease added for the garment to be comfortable) and the amount of design ease (the amount of ease added to achieve the desired fit for the design ie. a fitted versus a baggy style) included in the pattern.
By comparing the measurements from the two size charts, you will get an idea of how loose or fitted the garment is designed to be and how it’s going to fit you and so choose the best size.
Here’s an example using the shift dress from my book (all measurements are in cm’s):
|
BODY MEASUREMENTS |
FINISHED GARMENT MEASUREMENTS |
|
| Bust |
92 |
97 |
| Waist |
76 |
83 |
| Hips |
100 |
107 |
So, you can see from this example that for someone with body measurements which match those in the first column, the finished dress will be 5cm bigger than the body measurement at the bust, 7cm at the waist and 7cm at the hips.
The secret to sizing?
- forget dress sizes, never ever buy a pattern based on the dress size you buy when you go shopping – it is likely to be wrong,
- measure yourself accurately and honestly – remember you want to make something that fits, not that you’re going to diet into,
- see beyond the dress size that your pattern might be telling you that you are – it’s meaningless, it’s the actual measurements that are important
- check the finished garment measurements as well as the body measurement chart before you cut your pattern.


Having difficulty with patterns and measurements in hip area and hip to waste ratio. I’m petite and my hip bones are only 4 and 1/2 inches below my waist. All measurement guide refer to hips at 7″ below waist and several body measurements are in reference to hips being at this standard. How do I incorporate this into a pattern? Could you suggest a book that would cover this problem?
LikeLike
Hi, it’s really easy to shorten the waist to hip length on most patterns – jut fold out the excess length across the pattern pieces and redraw the centre and side seam lines. I’ve used The Perfect Fit book (https://www.amazon.co.uk/Perfect-Fit-Practical-Adjusting-Professional/dp/1845430581) a lot with students it’s easy to follow with clear step-by-step photos. Hope that helps!
LikeLike
Pingback: Top 20 Beginner Sewing Questions (& Answers!) | Wendy Ward
Pingback: The Minefield That Is Women’s Sizing | Wendy Ward