When Portia who hosts the fabulous Makery blog asked if I’d be up for her having a go at a hack idea she had in mind for the Brightside Shrug I jumped at the chance. Portia and I seem to have very similar tastes (always a pleasure to find an kindred aesthetic spirit) and I was really intrigued to see what she would come up with. I’m not precious about people altering my patterns, in fact I love to see the clever and creative ways my patterns are interpreted by different makers. So, over to Portia….
I have an irresistible urge when I see a pattern, to mess with it. For some reason when I look at a sewing pattern I start imagining variations of it. A tweak here. A tweak there. And you can change the look and feel of a pattern. Basically pattern hackery is fun and what’s more, using an existing pattern as a jumping off point means the hard work of drafting is basically done for you. Playing with a pattern to create different variations can give you more bang for your buck when you buy a pattern too; and who doesn’t love that?!

What I’ve often wondered though is whether designers mind when you mess with their patterns? After all, they’ve spent all that time and skill creating a pattern and along you come and start changing it! I mean, isn’t it a bit like having someone cook you a gourmet meal, then covering it in salt or pepper before you’ve even tasted it? (For the record….I absolutely do not do that!) Well I needn’t have worried. Methinks Wendy is a passionate explorer of ideas because when I tentatively mentioned to her that I’d been pondering a “longline” hack on her MIY Brightside Shrug, I could almost hear her clapping her hands together with delight. And when she asked if I could turn it into a guest post for her blog, well, honoured, right?


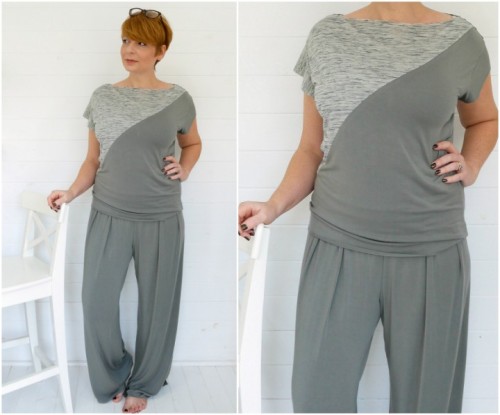
So here is the starting point. Beautifully modelled by Wendy. It really is a great little pattern. Especially for beginners. I especially think it’s a great project to cut your teeth on a serger with. I really do love the style of this. So neat and compact and perfect to throw over a tee. But the beauty of being able to sew your own clothes is adapting them to suit you. Now I’m a bit self-conscious when it comes to my waistline. So it’s a matter of feeling comfy to me to have my midriff covered; and I generally prefer my cardigans to be at the hip or lower.

Much lower in this case, because I hacked it so it was knee length!

It’s a very simple hack. I tested the idea out in miniature first. When you buy the pattern in pdf there’s a layplan for the pdf tiles and I simply cut the whole pattern piece from that and messed around with it on paper first. I even cut a miniature in fabric and sewed it up but forgot to take a pic of that! You can see the basic idea here. I’ve extended the bottom section of the pattern to make it longer following and extending the angle of the side seam…

Here it is drawn directly onto fabric…

Construction is exactly the same as the pattern. Except of course, when you’ve finished sewing the underarm/side seam sections, you’ll have the extended bottom section, well, extending. Which actually looks a bit weird as you sew because essentially it’s at right angles to the top section. But thanks to the nature of knit fabric (this is French Terry from Girl Charlee) as soon as you put it on it will automatically stretch out a little and drop down and hang vertically

Now of course changing the length of the back section means the existing pattern piece for the band that goes around the entire shrug, is basically redundant. It’ll be too short. Simply measure the new circumference of the shrug opening and cut a longer band to fit. (Same length as the circumference plus a little SA)

Apply the band as per the pattern instructions. Pressing the seam allowance to the inside and top stitching down. When you reach the section at the side seam where the back is longer than the front, simply ease/gently stretch the seam so it’s straight. Much in the way you would treat a curved seam on a serger.

Ok, ignore the fact that I had to piece my neck/hem band together because I accidentally cut through my only continuous strip of fabric. Don’t judge. We’ve all been there 😉 In any case, when you look at the underarm/side seam you can see that the bottom section (the one that I extended and was essentially at a right angle) now hangs more or less vertically with a light curve. That my friends is the magic of sewing with knits. They will forgive you pretty much anything. Including turning a 90 degree angle into a 180 degree angle!

And hey presto! A longline Brightside Shrug. Simple!
Massive thank you to Portia for a brilliant post. I love this version of the Brightside shrug and would never have imagined that this was what she would come up with. And that little tip of trying out pattern adaptations on the miniature pattern pieces – stroke of genius Portia!! I obviously will have to be trying one of these versions for myself now too. What do you think? Inspired to have a go?
You can get your copy of the pattern in printed paper form here or as a pdf download here and to encourage you to get hacking your own version, enter the code “makerybrightsidehack” when you checkout to get 15% off your order until Tuesday 29th March.
Happy hacking!!
© Wendy Ward. Share this: