


SHOP


NEWSLETTER

Follow Me On

-


Pinterest

YouTube Channel


Posted in Sewing Help, YouTube tutorials
Tagged how to sew, how to unpick, machine tacking, quick unpicking, sewing advice, sewing help, sewing tips, Wendy Ward
For the last 3 months I’ve been talking about how to use your leftover fabric scraps, organising and de-cluttering your fabric stash and how to pair your newly organised fabrics and patterns into winning combinations. The last of this mini series is all about planning your projects; to make best use of your time, to avoid stressful sewing and to improve your skills and knowledge.
Posted in Sewing Help, Sustainable Sewing
Tagged fabric burn test, fabric checklist, fabric guide, fibre content, how to burn test fabric, know your fabric, know your fibres, plan your sewing, sewing help, sewing tips, shop your stash, stash busing projects, stash busting, use your stash, Wendy Ward
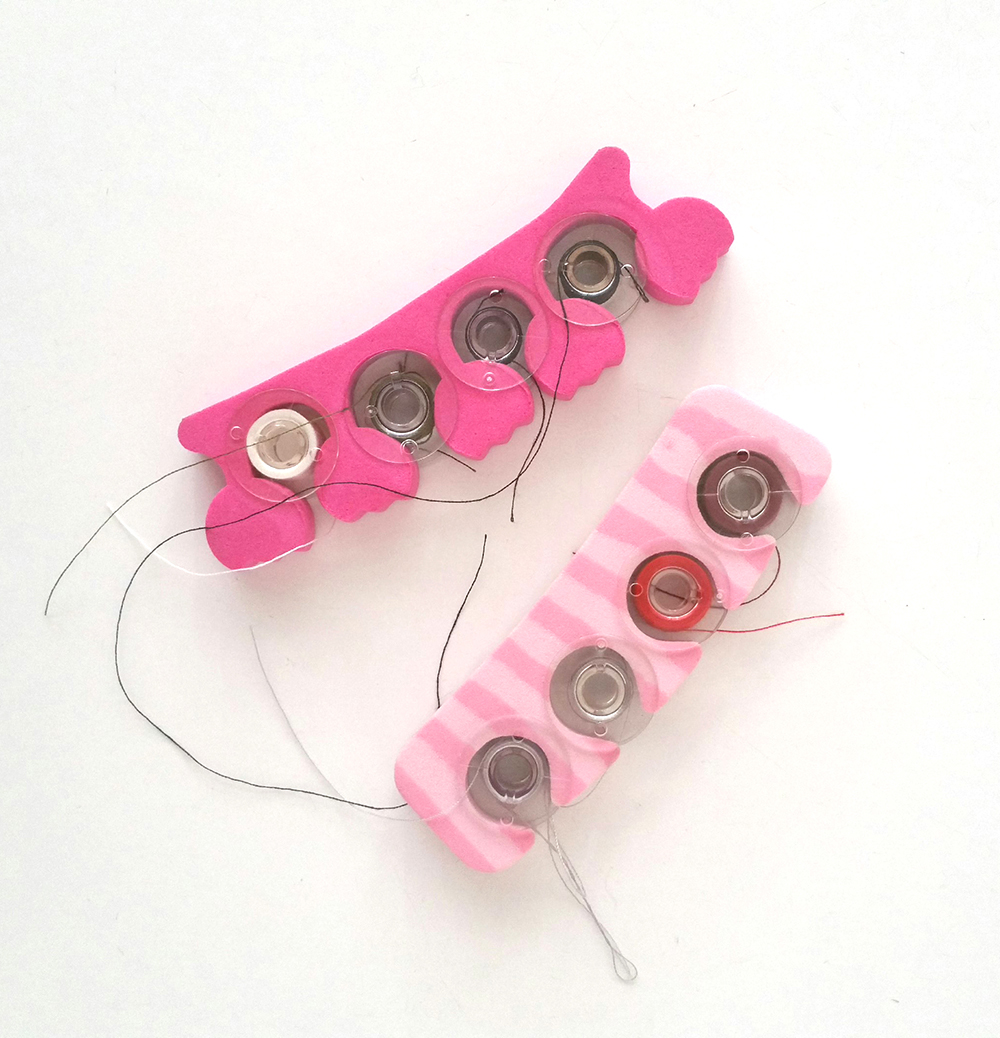
Do you have to fight your way through a tangled nest of threads at the bottom of a box or drawer every time you need a bobbin?
Life’s too short, find some toe dividers and make your own bobbin holders! Keeps your bobbins neat, tidy, you can see what colour thread is on them and they then fit easily into your portable sewing kit. Lots of my MIY Workshop students have started bringing bobbins to class like this.
Want tips, special offers and first dibs on new patterns? Join my newsletter here.
Want to join one of my classes at MIY Workshop in Brighton? Join the MIY Workshop newsletter here for advanced booking onto new classes.
Posted in MIY Workshop - Sewing Classes, Sewing Machines, Tools & Equipment
Tagged bobbin holder, Brighton, diy bobbin holder, east sussex, how to store bobbins, learn to sew, miy workshop, Sewing Classes, sewing classes brighton, sewing classes east sussex, sewing help, sewing space, sewing tips, storage, Wendy Ward
It’s my turn today in Portia’s August spectacular blog series “The Refashioners”. This year the theme is “Jeanius” and I’m not going to give the whole game away here, so hop over to Portia’s blog http://www.makery.uk to see the whole shebang.
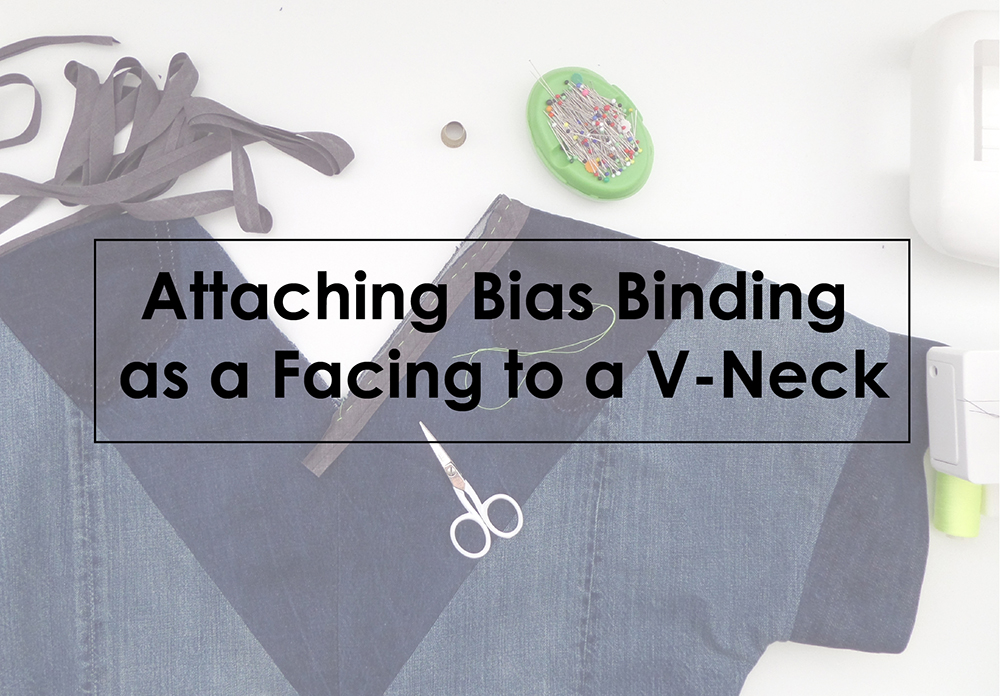
However, what I did end up doing with my project was, without even planning to, write a detailed step-by-step tutorial for how to achieve my favourite edge finish on a V-neck. So I’m going to just share that bit as a mini self-contained tutorial. Here goes:
1. Position the end of the bias binding beyond the intersection of the two seam allowances at the point of the V neck on the right side of the garment and pin in place. (I also tacked mine in place to make sure I was super accurate at the point of the V – start your tacking at the intersection of the two seam allowances at the point of the V and tack along the crease line in the binding.)

2. It helps to pin the overhanging end of the binding back on itself so that when the other end of the binding reaches the intersecting seam allowances at the point of the V you can place it in exactly the right place.

3. Your tacking should stop in exactly the same position at the point of the V as it started on the other end of the binding. Machine in place.

4. Snip into the seam allowance of the garment as close as you dare to the point of the V.

5. Let the bias binding fold back on itself to cover your stitching and then fold it around completely to the inside of the neck.

6. The two ends of the bias binding will overlap each other.

7. Wrap one end of the binding around the other.

8. Cut off the longer end of the bias binding that isn’t tucked under and pin and tack the whole of the binding in position close to the loose edge.

9. Machine the binding in place from the right side of the garment following your tacking.
NOTE: some people like to understitch the first line of machining (after step 4). It can help to keep the binding on the wrong side of the garment. I don’t always understitch, only if I’m working with particularly bouncy fabric.
Ta-dah here’s how it turned out on my Refashioners project:

If you fancy having a go at making your own bias binding, you can find my tutorial for making continuous strip bias binding here, it’s quick and a really thrifty way to use up leftover fabrics – a 47cm square can make 7.5m of bias binding!!

Remember this post that I wrote asking if your sew-jo has ever left you and how you’ve got it back? Well, responses to that post, comments I got from people on my Instagram, Twitter and Facebook feeds and a bit of my own research have resulted in a comprehensive article for this month’s Love Sewing magazine. So comprehensive in fact that it needed to be quite heavily edited to fit into my allotted double page spread! Not one to let work go to waste, here is the full piece in all its unedited glory.
May your sew-jo never leave you again!

How do you get your sew-jo back?
I’ve been sewing for over 30 years and there have definitely been times in my life when sewing has been more and less important to me. Most of us have times when our creative outlets have to take a back seat because life just takes over, but that’s normal and it doesn’t mean we want to do it any less, in fact often we want to do it more at these times, precisely because forces beyond our control are keeping us from it!
But what if your drive to create leaves you completely? Has your enthusiasm for sewing ever left you temporarily? Again, although it’s scary, I think it’s a perfectly normal phenomenon and comes as part of the creative package. After working 60 hour weeks to write my new book whilst keeping the rest of my business going for the last 9 months, mine was definitely on the wane recently.
I hope the sharing of some of my own experiences on this subject and the collective wisdom contributed by other sewists will help should you find yourself stuck in a creative rut.
Why does it go?
So what are the most common causes of this sewing equivalent of writers’ block?
Perfectionism & Fear of Failure
Perfectionism is the enemy of creatives, it’s a fine balance; I think a little bit of a perfectionist tendency can be useful as it keeps you striving to do the best you can and constantly improving your work, but too much can be the complete opposite and actually stunt creativity. The way it manifests is the thought creeping into your head that if you did that thing you’ve been thinking about making; “it would be a bit rubbish and never as good as it should be, so I might as well not bother”. I’ve definitely suffered from this in the past and the way out is simply to just allow yourself to make a mess, accept that mistakes are useful and help to develop your work, how can you learn if you don’t make mistakes? It’s impossible to just be perfect all the time, how could you ever develop and improve on perfection?
Logistics
This was a recurring theme for the sewists who shared their experiences with me online; if everytime you sew you have to clear the dining table, unpack your project and your sewing machine, it’s often time to put it all away again as soon as you’ve started, so why bother?
Too Much Sewing For Others
Taking on too many projects for others was a cause mentioned by a few people online. While it’s rewarding to make things for others (when they’re well received!), make sure you put time aside for selfish sewing too.
Are You Happy?
There is a theory that you need to be in the right headspace to be creative, happy and relaxed and unencumbered with too many worries. Bobobun68 on instagram shared an example of this saying “I sewed nearly every day until my dad died and then it went for months. When my marriage ended two years ago I could manage work and being a mum but all creativity went. As my happiness returned sewing and inspiration came flooding back hugely like an addiction. I’ve pushed myself to learn more and I’m loving it, so I’d say my sewing mojo is heavily influenced by my emotions.”
However, there is a parallel theory that if you’re not happy to start with, being creative can actually help to make you happier; a theory which is backed up by phychological research explained in this brilliant piece about overcoming writer’s block by Maria Konnicova on the New Yorker website: http://www.newyorker.com/science/maria-konnikova/how-to-beat-writers-block If you can push yourself over that initial hurdle to start creating when you’re feeling low, the creative process will usually leave you feeling in a much better place.
How do you get it back?
Variety & Learning
They say variety is the spice of life, so try a different craft from sewing; learning something new is always really absorbing and rewarding, so get a friend to show you or take a class. There are some brilliant short classes to get your creative juices flowing again on Creative Bug.
Inspiration
Fresh inspiration surrounds us in magazines, books and online. Join a local creative group or connect with fellow makers online. I recently got myself a copy of Oh Comely magazine as an antidote to purely sewing magazines; it’s still aimed at creative types but encompasses a lot more. I’ve heard Flow and Frankie are also great reads.
Instant gratification
Sew something quick and small or something safe that you’ve made before and you know works well, I love verykerryberry’s advice on Instagram to sew pyjama pants. The perfect remedy I’d say, who doesn’t need more cosy pymama pants and they’re easy to sew for others too.
Get out there
Walk the dog, go for a run, go to the gym, I find any kind of exercise refreshing and invigorating to mind, body and creative soul. This is one that definitely works for me and that I use a lot; I’ve often had some of my best ideas while dripping with sweat in the gym!!
Focus
Focus is always useful to me, if I think “oh I can make anything I want”, I can’t make anything! Whereas if I think “I’d like some new t-shirts”, I’m off!
Do the washing up
Any kind of mindless repetitive physical task can help unlock the creative part of your brain.
Dedicated space
Try and organise a sewing space at home, no matter how small, even if it’s just keeping your machine accessible (and visible as a constant reminder) on top of a cupboard or shelf ready threaded up and with your project neatly nearby you’ll be able to grab small bits of sewing time as and when the urge takes you.
A project for every circumstance
Have a few projects on the go and I do say this with caution as being a serial “starter” can also lead to sewing misery; you need to be a “completer” too. Some great advice from Deborah who commented on my blog was to make sure you have a small portable project as one of your projects on the go. That way you can take it on train journeys, do it in front of the TV and possibly even take it into meetings at work….!!
Have some “playtime”
Open up the floodgates – whenever I write, it’s like a stream of consciousness and ideas at first, I never write something polished and finished from the start. I like to edit heavily! It’s the same with sewing; I play around with ideas, use some cheap fabric that I’m not worried about spoiling and make lots of toiles, play around with some fabric embellishment or manipulation ideas or hack away at an old garment that I was going to throw out anyway.
I love some of the advice in this post on the Brainpickings blog, especially the tip from artist Lisa Congdon to spend 30 days doing repeated drawings of something that you’re already comfortable drawing. You could easily apply this to sewing: make a few versions of a quick tried and tested pattern, but use different fabrics, try some easy style adaptations to the pattern, add some embellishments, even try making it from recycled old garments.
Gift Sewing
While sewing for others can sometimes cause you to lose your sew-jo, certain types of selfless sewing can also be a way to reconnect with the joy of sewing. I love the approach of poppiesgrowinva on Instagram who says: “When I feel down about sewing I sew something super easy like a pillow cover or stuffed bunny for my boys. Sometimes “selfish sewing” doesn’t feel as great as you expect it to. Sewing things others can enjoy and benefit from, those have been my favorite makes!!! We are also too critical of ourselves. When you make a simple gift for someone they don’t see any of the flaws you see yourself when sewing! It can help you see that things don’t have to be perfect!!” Also a good technique for when the perfectionism monster tries to take you over…
Go back to things and edit/rethink
I often use a technique that I call “tricking myself into working” rather than sitting down with a blank page, fresh piece of fabric, brand new word doc open on my computer and thinking “right, now I’m going to do that thing” I just make adhoc notes and randomly try stuff out as and when it pops into my head and before I know it I have a new project, pattern, blog post well underway. An essential tool for applying this technique is to have a notebook/sketchbook and pencil with you at all times!
Remember: the end result isn’t always the be all and end all.
Children never suffer from these creative blockages, they create with that beautifully uninhibited approach of simply enjoying the process without focusing on the end result being the be all and end all. Social media, whilst being a wonderful place to share, encourage and seek inspiration that can help you rediscover your sew-jo, can also be a place to make you feel inadequate and like you’re not coming up to scratch. If so, unfollow the people who most make you feel that way or take a break completely for a while. Most important is what you’re doing and how much you’re enjoying it, not what everyone else is doing.
On a bigger, longer term solution I think it’s healthy for creative types to build variety into their everyday working and / or hobby lives.
I think I’m quite lucky in that I’ve managed to carve myself a job where I get to do a variety of differently creative tasks. Take writing this column! I love writing and it’s great to have an outlet and a purpose to write and while still being creative and thoughtful, it’s different to sewing.
I’ve also recently taken on a collaboration to work with a local charity on some clothes recycling projects and have recently finished my contribution for this year’s The Refashioners.
Even my most recently acquired hobby (learning how to play trumpet) taps into this need, I experienced my last creative lull about 18 months ago and realised that I needed to redress my work/life balance. I decided to learn a musical instrument because a) it’s good to keep learning b) it’s another creative outlet unrelated to what I do to earn a living and c) it’s something I know I can get absorbed in and get “flow” from, the way I can with sewing.
So, don’t give yourself a hard time, embrace a little creative block as part of the creative process and a reminder that you need a bit of variety and a bit of nourishment for your creative soul. Go out for a walk, take that online class and break out the colouring pencils!
Thanks to everyone who contributed their stories online.
Want to hear more about what I’m up to and get subscriber-only resources and offers? Join my newsletter and see what you’ve been missing!
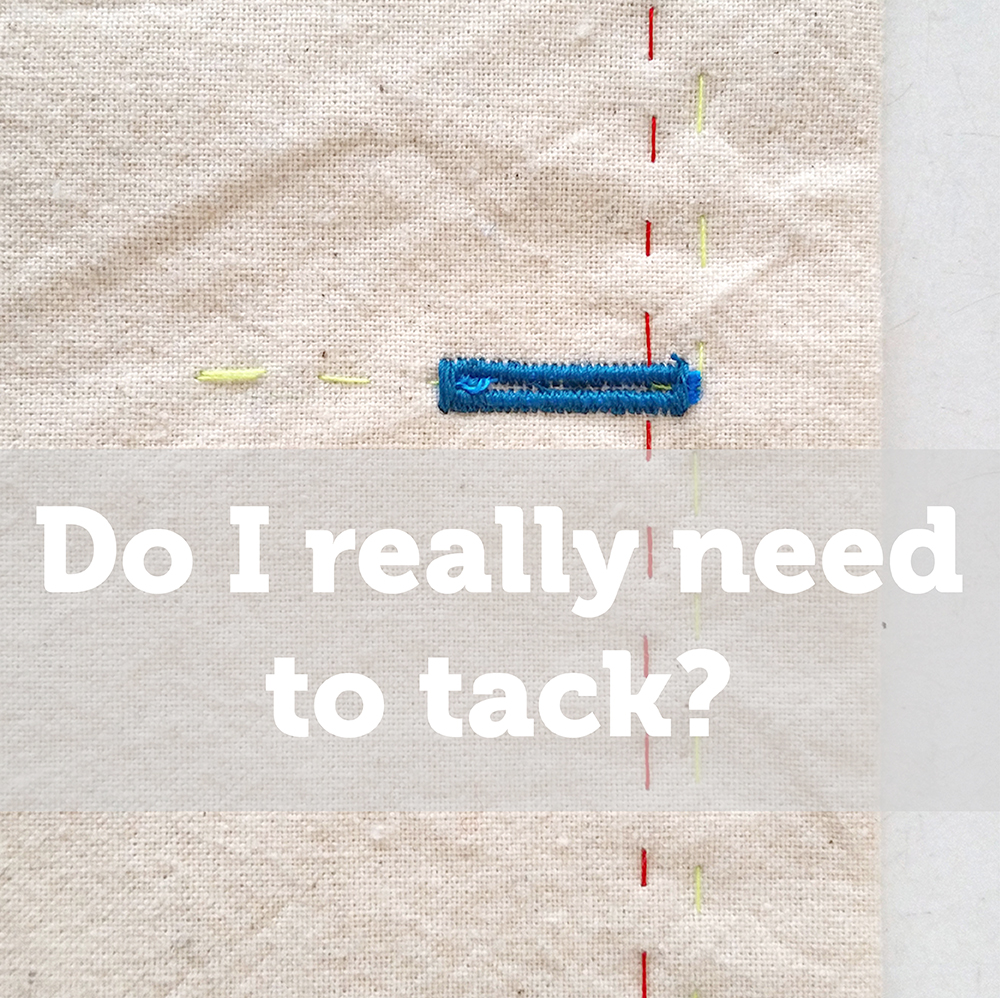
You’d think I get my sewing students to do this for my own amusement sometimes if you came to one of my classes!! If I had a pound for every time I’ve been asked this question…..
Now, my stock reply is this: wouldn’t you rather spend a bit of time tacking, than unpicking machine sewing that’s gone wrong? And isn’t tacking more enjoyable than unpicking machine sewing?!

Don’t get me wrong, I don’t tack everything, but honestly, there are some things that I will always tack, mainly set-in sleeves, zips, collars, cuffs, pleats and usually hems get tacked. I just don’t see how it would be possible to get the kind of results I expect without tacking. When it comes to my students, I get beginners to tack most things and my more confident and experienced students will only tack more fiddly things such as sleeves, zips and awkward shaped seams.

I think tacking can also take away a lot of stress for beginners; if seams are held securely in the right place with tacking, newbies can just focus on the machining and being accurate without needing to worry about also removing pins as they go and making sure they don’t sew over them. (That’s right – don’t ever sew over pins, even if they’re placed at right angles to your seam, your needle can still catch the pin and get a slight nick in the needle and I’ve even heard accounts of needles breaking and flying off when people have done this and that’s not a scare story!)
Here are some more uses for hand tacking, that I think can’t be beaten with any other methods:
I have recently become a convert to machine tacking in certain circumstances; a machine tacked seam is stronger than a hand tacked one and so can be useful when fitting and if you machine tack your seam closed before inserting a centred or slot zip you can get really neat results. To set your machine up to machine tack, choose the longest stitch length and a tension setting a bit lower than you would normally chose for the fabric.
At the end of the day, tacking is also a good exercise in reminding us what makers had to do before the days of sewing machines and then look at traditional bespoke tailoring; tacking and sewing is an integral part of how they create such beautiful garments. Come on, what’s good for Savile Row tailors has got to be good for us dressmakers too hasn’t it?!

This post is part of my Q&A column for Love Sewing magazine, issue number 26. Get your copy now to read the other questions I tackle this month on ease and when is the right time to start pattern cutting.

You will find some little extras in your next printed MIY Collection sewing pattern:
Just because. Every little helps doesn’t it?!
Posted in MIY Collection Patterns, Sewing Help, Sewing Patterns by Wendy
Tagged beginners sewing patterns, easy sewing patterns, fabric shopping checklist, how to measure yourself, indie patterns, learn to sew, MIY collection, modern sewing patterns, sewing help, sewing patterns for knits, sewing tips, Wendy Ward
